How to Upload PedigreePoint data
There are two ways you can publish data using Pedigree Publisher. In both cases you will use the "TOOLS-Export to PedigreePoint" menu command.
- Method 1 - direct transfer using the "Export to Web" button.
- Method 2 - indirect transfer by exporting to a file and then using phpMyAdmin to load that file.
To transfer your pedigree data to the web site, both methods require these initial steps:
- Start Pedigree Publisher then use the TOOLS-Export PedigreePoint command.
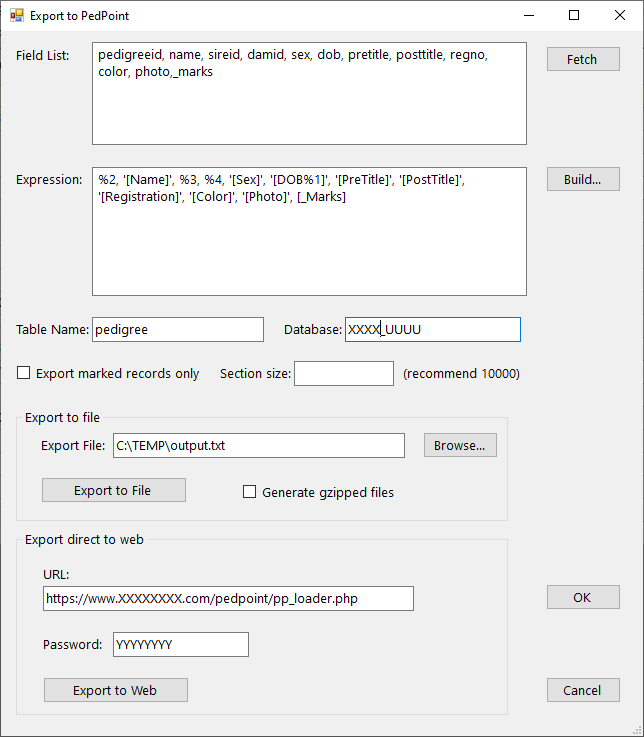
- The export dialog appears as below.
- Set the Expression: to "%2, '[Name]', %3, %4, '[Sex]', '[DOB%1]', '[PreTitle]', '[PostTitle]', '[Registration]', '[Color]', '[Photo]', [_Marks]". This assumes your database uses the standard field names. Change the names of the fields inside the square brackets to match the field names in your Pedigree Publisher database's Pedigree table. For example if you don't have a field called Registration but you do have a field called RegNo then change [Registration] to [RegNo]. The names must match exactly and they are case sensitive. See additional notes on the Expression in the next section.
- Set the "Table Name:" parameter. This is usually "pedigree" but if you have multiple breed databases then they will have different table names.
- You can optionally tick "Export marked records only" if for example you have some records you don't want to appear online.
The remaining steps will depend on whether you are using method 1 or 2.
Notes on export expression
The "expression" used in the PedPoint export dialog is a standard Pedigree Publisher expression for exporting. It is by default set correctly for the normal PedigreePoint, pedigree table schema. You can add more fields but you need to update the schema so the expression matches it.
The expression consists of normal characters (which are output as is) and special escape characters that begin with a percent, and field identifiers which are simple the name of a field in square brackets [ ]. The escape characters are as follows:
- %2 - the bookmark (an integer number) for this record
- %3 - the bookmark for the sire of this record
- %4 - the bookmark for the dam of this record
- %7 - the marks for this record. This is an integer were each bit is interpreted as a separate mark with its own color which will be displayed as a block of color in the lower right hand corner of the entry's cell.
The fields in the normal "pedigree" table in MySQL are as follows with the field size in parens:
`PedigreeId`
`Name` (64)
`SireId`
`DamId`
`Sex` (1)
`DOB`
`PreTitle` (32)
`PostTitle` (32)
`RegNo` (64)
`Color` (64)
`Photo` (64)
`_Marks`
The expression must match these 12 fields which means it must have 12 expressions separated by commas. Text fields must be enclosed in single quotes . The size of the exported field, if its a string (IDs and DOB are not strings), should not exceed the field sizes mentioned in the list above in parens.
You can include multiple fields from your database into a single MySQL field. Lets say that part of my expression was '[Field1]'. I could replace this with '[Field1] [Field2]', which would have the effect of combining those two fields.
A typical expression to use would be:
%2, '[Name]', %3, %4, '[Sex]', '[DOB%1]', '[Titles]', '[Obedience]', '[Reg No.]', '[Colour]', '[Photo]', %7
Method 1 - direct transfer
The additional steps for Method 1 are as follows:
- Set the URL: It will usually look like "http://www.yourdomainname.com/pedpoint/pp_loader.php". It is important to include the "http://" before the address.
- Click the "Fetch" button. This iwll automatically fill in the "Field List", which is the list of fields in the table specified in "Table Name:", and it will fill in the "Database:" parameter. If it doesn't then the URL is incorrect or you have not installed PedPoint correctly.
- Set the "Password:". This is the value in pp_config.php assigned to "$szLoaderPassword".
- Click the "Export to Web" button. A progress bar appears showing upload progress. When it completes a dialog appears stating how many records were transferred.
Method 2 - indirect transfer
Method 2 is a lot more complicated and the only reason you would use it is if Method 1 doesn't work for some reason. The additional steps for Method 2 are as follows:
- Set the "Database:". This will be the value in the pp_config.php file that is assigned to $DatabaseName.
- Leave the "Section size:" blank. This is the size that large exports will be broken into, if blank they would be broken up. For example if you file has 250,000 records then the export will create 25 separate files if the Section size if 10,000. If its 100,000 then only three files will be created. The reason for breaking up the export into separate files is that phpMyAdmin Import has a limit on the file size, although this is usually very large so it may not be necessary to break up the export at all, in which case just leave it blank.
- Set the Expression, Table Name as shown in the previous section. Set the "Field List:" to "pedigreeid, name, sireid, damid, sex, dob, pretitle, posttitle, regno, color, photo,_marks" or whatever the names of your fields in the MySQL table are. For example if you add extra fields to your MySQL table you will need to add them to this list. The list must also match one for one with the fields listed in the Expression.
- The 'Export To File' button exports the BreedMate current table - normally this will be the Pedigree table. Note this can be different than the name of the MySQL table to which you are copying the data. If you want to upload your Account table then you need to select that first before executing this command.
- The "Generate CGzip'ed file" option when ticked will create a compressed file which is about 25% the size of a normal file. The phpMyAdmin console knows how to upload and decompress these files so this is the recommended option as it greatly reduces upload times. Probably the only reason you would want to turn this option off is if you want to see what the files contain without manually having to unzip them.
- Click on the "Export To File" button. This will generate one or more files that you then need to transfer to your MySQL server.
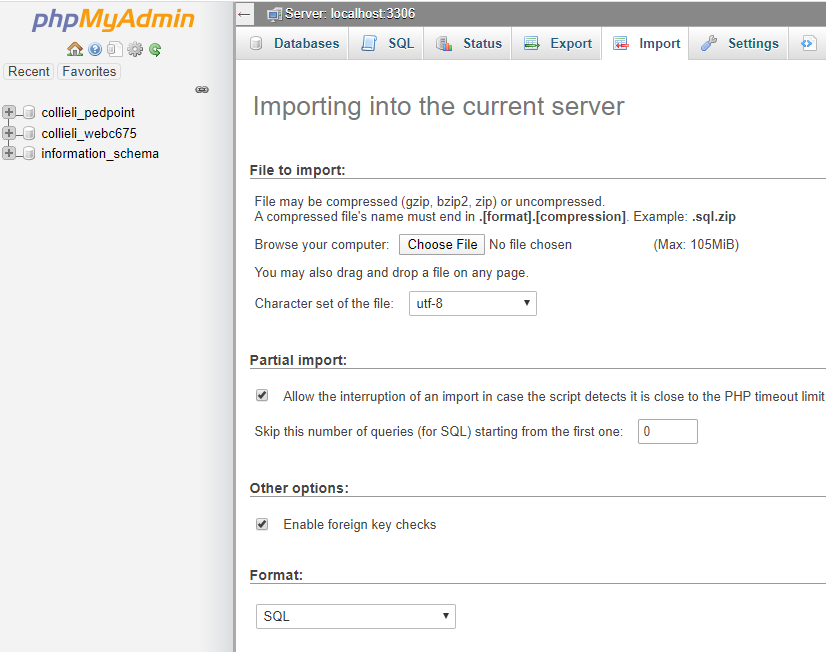
- The data files now need to be sent to the MySQL database server on your web site. The web files must be uploaded strictly in the order of their sequence number. Hence in the example above you must upload langdon(1).gz first. To upload login to your cpanel, then select phpMyAdmin , click on the "Import" tab and click on the Browse button and select each file in sequence. See screen shot below.